
How to Seat Carriage Bolts in Wood Without Spinning
Use a snug, straight through-hole, seat the square neck in sound wood and place the washer under the nut; stop if the bolt spins or wood crushes.
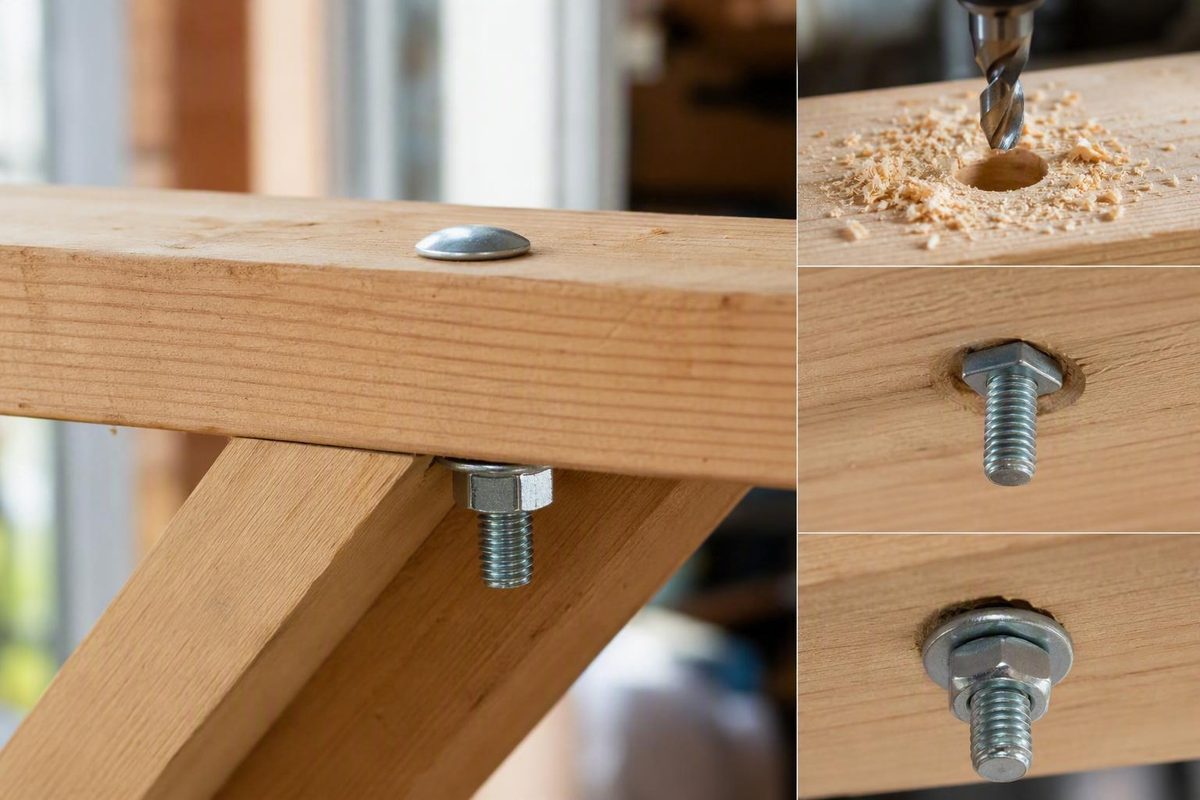
For a low-consequence shop assembly, a carriage bolt is a practical choice when it can pass completely through the parts, you can reach the nut side, and you want a smooth, drive-free head on the exposed face. Drill a straight, snug through-hole, seat the square neck directly in sound wood, place the washer beneath the nut, and tighten gradually only until the members are securely clamped. If the bolt spins or the wood starts crushing or splitting, stop and correct the fit rather than applying more torque.
The quick answer: when a carriage bolt works in wood
A carriage bolt suits a through-joint. Unlike a wood screw, it does not derive its hold from threads biting into timber. The bolt passes through the assembled parts and clamps them between its head and a nut.
Its smooth domed head has no screwdriver slot, socket recess, or wrench flats. Instead, the square neck beneath the head engages the wood and resists rotation while you tighten the nut. This leaves a clean exposed face and allows tightening from the nut side.
A carriage-bolt joint is a simple stack:
Exposed face                                              Nut side

       domed head
          ___
/ \
/_______\
       |square |   head-side       second
       | neck  |   member          member
       |_______|====== wood ======= wood ====== washer == nut
\________ round shank and machine thread ______/
- Domed head: The smooth, visible end of the bolt
- Square neck: Engages the head-side material and resists rotation
- Shank: Passes through the assembled members
- Machine thread: Accepts the nut
- Washer: Spreads pressure beneath the nut
- Nut: Draws the joint together
Choose the fastener by access and by how it will be driven or restrained:
| Fastener | Best fit | Access required | How it is driven or restrained |
|---|---|---|---|
| Carriage bolt | Through-joint with a smooth exposed head | Both sides | Square neck engages wood |
| Lag screw | Joint accessible from only one face | One side | Hex head drives threads into wood |
| Hex bolt | Through-joint where tools can reach both ends | Both sides | Wrench holds the hex head |
| Timber bolt | Timber joint calling for a finned or spurred head | Both sides | Fins or spurs engage wood |
These names are not universally interchangeable. Carriage bolts, timber bolts, plow bolts, coach bolts, and coach screws can have materially different head and neck designs. UK suppliers may use coach bolt for a DIN 603 carriage bolt, while coach screw commonly denotes a lag-type screw. Timber bolts generally use fins or spurs rather than a square neck, as shown in this comparison of carriage, coach, and timber bolts.
Check the joint before drilling
A clean hole cannot compensate for damaged material or inaccessible hardware. Run through this checklist first:
- Confirm that the bolt can pass completely through the assembly.
- Confirm that a washer, nut, and wrench or socket will fit on the far side.
- Put the members in their final positions and clamp them so they cannot creep while drilling.
- Select a location in sound wood.
- Check that the drill body and bit can remain perpendicular to the work.
- If the connection is specified, confirm the bolt size, length, spacing, and location before drilling.
Inspect both faces and the path between them. Avoid decay, loose or damaged fibers, obvious splits, checks, and poor-quality areas around large knots. An existing oversized or wallowed-out hole may admit the shank but leave the square neck with too little intact material to grip.
Do not predict behavior from the labels hardwood and softwood alone. Wood responds differently along and across its grain, and its properties vary with species, specific gravity, moisture, grain direction, defects, and service conditions. The USDA Forest Products Laboratory also notes that hardwood and softwood classifications do not correspond directly to actual hardness or softness. Its published property averages largely come from small, clear, straight-grained specimens rather than boards with knots, cross grain, checks, or splits, so those averages are not capacity values for the piece on your bench (USDA Wood Handbook, Chapter 4).
The available practical installation sources do not establish universal values for bolt length, washer diameter, edge distance, fastener spacing, or minimum member thickness. If the connection is specified, structural, or safety-critical, obtain those dimensions from the project plan, connector manufacturer, current applicable code, or a qualified designer.
How to install a carriage bolt in wood
For an ordinary, low-consequence wood-to-wood shop assembly, use this sequence:
- Assemble, align, and clamp the parts. Mark the hole with the members held in their working position.
- Drill a straight through-hole. Keep the drill perpendicular and drill through the clamped assembly so the holes remain aligned.
- Clear the hole. Remove chips and loose fibers that could obstruct the shank or hold the members apart.
- Insert the bolt from the finished face. Put the domed head where you want the smooth profile.
- Seat the square neck. Apply controlled pressure or light taps until the neck engages the wood.
- Install the washer and nut on the opposite side.
- Tighten gradually. Watch the head, washer, neck, and surrounding fibers as the joint closes.
Choose a snug through-hole
A common practical starting point is a round hole approximately equal to the bolt’s nominal shank diameter. For example, a 3/8-inch carriage bolt is commonly paired with a 3/8-inch bit in basic installation guidance (Benchmark Abrasives’ carriage-bolt procedure).
That is shop guidance, not a universal engineered fit. The hole should admit the round shank without leaving so much clearance that the square neck has no firm material to engage.
Whenever practical, clamp the parts in final alignment and drill through them as an assembly.
Seat the neck—not the whole dome
Insert the bolt and bring the underside of the head against the wood. Use hand pressure, a clamp, or light controlled tapping to start the square neck. The neck and flat underside of the head seat against or into the surface; the domed portion generally remains visible.
Do not drive the entire dome below the surface merely to make it “flush.”
Put the washer under the nut
Place the washer between the wood and the nut. It distributes the nut’s bearing pressure over a wider area and reduces the tendency of the nut to dig into the surface. Practical installation guidance also warns against placing an ordinary round washer beneath the head when the square neck must engage the wood directly (BuildToolHQ’s carriage-bolt installation guide).
Start round; modify only the neck seat if necessary
Do not automatically file the complete through-hole square. A snug round hole supports the shank while allowing the neck corners to form a local seat.
Installation instructions differ: Fastener Depot describes filing a square opening, while other vendor guidance starts with a round, shank-sized hole and suggests a shallow recess only if the neck will not grip. If dense wood prevents the neck from entering, verify that the bolt is square to the surface and that the hole is straight and correctly sized.
How tight should the nut be?
The available evidence does not support a universal torque value for carriage bolts clamping wood. Tighten gradually only until the members are securely clamped.
Torque is an indirect way to create clamp force, and friction in the threads and beneath the turning nut affects how much clamp force a wrench reading produces. Wood adds another variable because it can indent, crush, split, or deform rather than behave like a steel clamped member.
Bolt diameter alone therefore cannot determine an appropriate wood-joint torque. The result also depends on:
- Species, density, and moisture
- Grain direction and local defects
- Hole fit and neck engagement
- Washer bearing area
- Member thickness and joint geometry
- Bolt and thread condition
- Lubrication, contamination, and thread friction
The publication’s bolt-torque basics guide explains the relationship between torque, friction, and clamp force. Its baseline table is expressly for dry, clean, coarse-thread fasteners in steel; those values do not apply to carriage bolts clamping wood.
Use the wrench slowly. Stop if the washer or head begins sinking rapidly, fibers visibly crush, the wood starts splitting, or the square neck rotates. These are signs that the wood or neck seat is deforming rather than evidence that the joint needs a larger wrench. Wood can undergo permanent deformation or failure at higher stress, and practical carriage-bolt guidance specifically warns that excessive tightening can crush or split it (USDA Wood Handbook, Chapter 4).
Do not import a metal-joint torque value or treat “snug plus a quarter turn” as a wood specification. Once the parts are secure, additional wrench travel may go into damaged wood rather than useful clamping.
Troubleshooting spinning, sinking, splitting, and removal
Stop at the first sign of trouble. More leverage usually makes a fit or material problem worse.
| Symptom | Likely issue | What to do |
|---|---|---|
| Bolt spins while tightening | Neck not seated, hole oversized, or fibers damaged | Stop, back off the nut, reseat the neck, and inspect the wood |
| Neck will not enter dense wood | Hole crooked, poor alignment, or neck corners cannot start | Check hole size and squareness; if needed, make a controlled shallow neck recess |
| Washer or head sinks rapidly | Bearing pressure is deforming the wood | Stop tightening and inspect for crushed fibers |
| Wood starts splitting | Defect, edge condition, misalignment, or excessive seating force | Stop and unload the connection |
| Bolt will not pass straight through | Members shifted or the hole wandered | Correct the layout or remake the affected part rather than forcing the bolt |
| Bolt spins during removal | Neck has lost engagement | Apply cautious outward pressure beneath the head while turning the nut |
| Nut is seized and wood is weathered | Breakaway force exceeds the wood’s ability to restrain the neck | Prepare for destructive fastener removal while protecting retained parts |
When a new bolt spins, back off the nut before trying to reseat the head. Practical installation guidance recommends reseating the square neck rather than applying more tightening force (BuildToolHQ’s carriage-bolt guide). Once the joint is unloaded, inspect whether the neck corners still have intact fibers to bear against. If the pocket is wallowed out, driving the same bolt harder will not restore the missing wood.
A neck that will not enter sound, dense material presents a different problem from a neck that has torn out its seat.
During removal, cautious outward pressure beneath the head may pull the square neck back into contact while the nut is turned. If rusty threads are combined with decayed, weathered, or enlarged wood, the breakaway force can exceed the wood’s ability to restrain the neck; cutting or otherwise destroying the fastener may then do less damage to the retained parts than continued prying or wrenching (community discussion of carriage bolts in softwood).
Where practical shop guidance ends
This installation method is common practical guidance for low-consequence shop fixtures and assemblies; it does not establish the capacity or suitability of a particular connection. Do not use it as a substitute for a specified design on railings, decks, play equipment, overhead loads, lifting points, machine restraints, occupied structures, or other connections whose failure could injure someone. For structural or safety-critical work, follow the project drawings, exact connector-manufacturer instructions, current applicable code, or qualified engineering guidance.
A retailer’s list of example applications does not establish allowable load, code compliance, suitable bolt diameter, member thickness, edge distance, or spacing. Do not substitute a familiar carriage bolt when a plan or connector specification calls for another fastener.
Multiple bolts also require more thought than multiplying one bolt by the bolt count. Fasteners in a row parallel to the applied load do not necessarily share that load equally: outer fasteners can carry more than inner ones, and adding bolts does not increase capacity in direct proportion to their number. Inaccurate hole alignment can also worsen the behavior of a multiple-fastener connection (USDA Forest Products Laboratory analysis of multiple-fastener connections).
That finding is a design warning, not a shortcut formula. The cited analysis concerns a particular multi-member, double-shear model and requires engineering inputs. Its equations should not be transferred wholesale to every carriage-bolt joint. At the bench, the practical lesson is to drill accurately, avoid forcing a misaligned row together, and never assume every added bolt contributes an equal share.
Will a carriage bolt grip pine, cedar, or other softwood?
It can grip sound softwood when the hole is snug and the square neck seats without tearing out the surrounding fibers. Community reports describe carriage bolts holding in softwood, but those reports do not establish a capacity for a particular board or joint.
Inspect the material for crushed fibers, knots, checks, decay, and an enlarged neck pocket. Do not assume all hardwood will grip better or all softwood will grip worse; density, moisture, grain direction, defects, and the condition of the individual piece all affect its behavior.
Can a carriage bolt connect metal to wood?
Yes. A carriage bolt can pass through metal and wood, but the arrangement still needs a deliberate way to prevent rotation. The square neck may seat in the wood, engage a suitable square hole or bracket, or use another application-specific restraint.
Make sure the metal does not prevent the neck from reaching its intended seat. Basic metal-to-wood compatibility does not establish structural capacity, corrosion compatibility, or code compliance.
Is a coach bolt the same as a carriage bolt?
Sometimes, depending on region and supplier. UK vendors commonly use coach bolt for a DIN 603 carriage bolt with a domed head and square neck. That does not make a coach screw, timber bolt, or plow bolt interchangeable with it.
Check the actual fastener geometry and specification rather than ordering by name alone. For this installation method, the defining features are a through-bolt with machine threads, a nut, a domed drive-free head, and a square neck intended to engage the wood.
At the bench, confirm two-sided access and sound wood, drill a straight snug through-hole, seat the square neck directly in the wood, and put the washer beneath the nut. Tighten only until the assembly is secure. If the bolt spins or the wood crushes or splits, stop and correct the joint; wherever failure could be dangerous, use the specified connection design.